Wednesday 30 July 2014

Adding Polygons and Polylines to Bing Maps Windows 8.1


Introduction


Hi everybody, 


Today I am gonna show you that how to draw complex polygons and polyline on Bing Maps in Windows Store Application. Many of you guys might think that It would be an rocket science but literally it doesn't. 


Objective 

  • To know the difference between polygons and polyline.
  • To know the need and usage of polygons and polyline.
  • To draw complex polygons on certain area of map.
  • To draw polyline between any two points. 


Description

Polygons are different shapes like square, circle, ellipse, triangle or any custom shape while polyline is only a straight line between two specific points. Youy can also form polygon through polyline by drawing multiple polylines end to end but if you want a complex or custom shape don't go for it because it can be easily done using polygon.

Implemention

Before starting let me explain the things which you need to have with you.

1- Visual Studio 2012 or later. (2013 Recommended)
2- Bing Map SDK for Windows 8 or Windows 8.1 

If you don't have download it from given link below

For Windows 8 Visual Studio 2012

For Windows 8.1 Visual Studio 2013
  

3- Bing Map Key (Credential Key)

To access Bing Map you need to create a Bing Map Credential Key. If you already have its good but if you don't have then click the given link below, login to Bing portal with your Microsoft, Hotmail or Outlook account and generate credential key by putting some information they required. 

Note: Don't tell your credential key to anybody as it is important to keep it private. 

If you have all above mentioned things you are easily able to implement Bing Maps in your windows store application. 

Now lets move toward implementing. 

1- Run the Bing Map SDK installer by doing double click on it. 
2- It will take couple of seconds to install. 
3- After installation restart your visual studio if it is already running otherwise run visual studio 2013.
4- Create new windows store (Blank App) Project and name it. 
5- In Solution Explorer right click to reference and add 

1- "Bing Maps for C#, C++ or Visual Basic"  
2- "Microsoft Visual C++ 2013 Runtime Package for windows" 

references as shown in picture below. 


6- After adding you will see a yellow warning sign on both references in solution explorer as shown in picture below. 


7- Don't worry it is just due to addition of Visual C++ Runtime reference because some reference only allows to debug or build solution only for one architecture, either it is ARM, x86 or x64. 

So to eliminate this warning change platform from "AnyCPU" to "x86" from Build Configuration Manager and see references after closing it as shown in picture below.


So we have added references successfully. 

8- Now open MainPage.xaml and add Map Control from toolbox and name it "map" or "myMap".


Note: The controls in Bing Map SDK will be automatically added in toolbox. So you can use them directly as explained. 

9- Now the next step is to add two new buttons. One for adding polyline and second for adding complex polygon. So add two buttons and name them polylinebutton and polygonbutton and create their click event handlers.

Your MainPage.xaml will look like this


Now open MainPage.xaml.cs from solution explorer and see, after creating both buttons click event your MainPage.xaml.cs will look like this


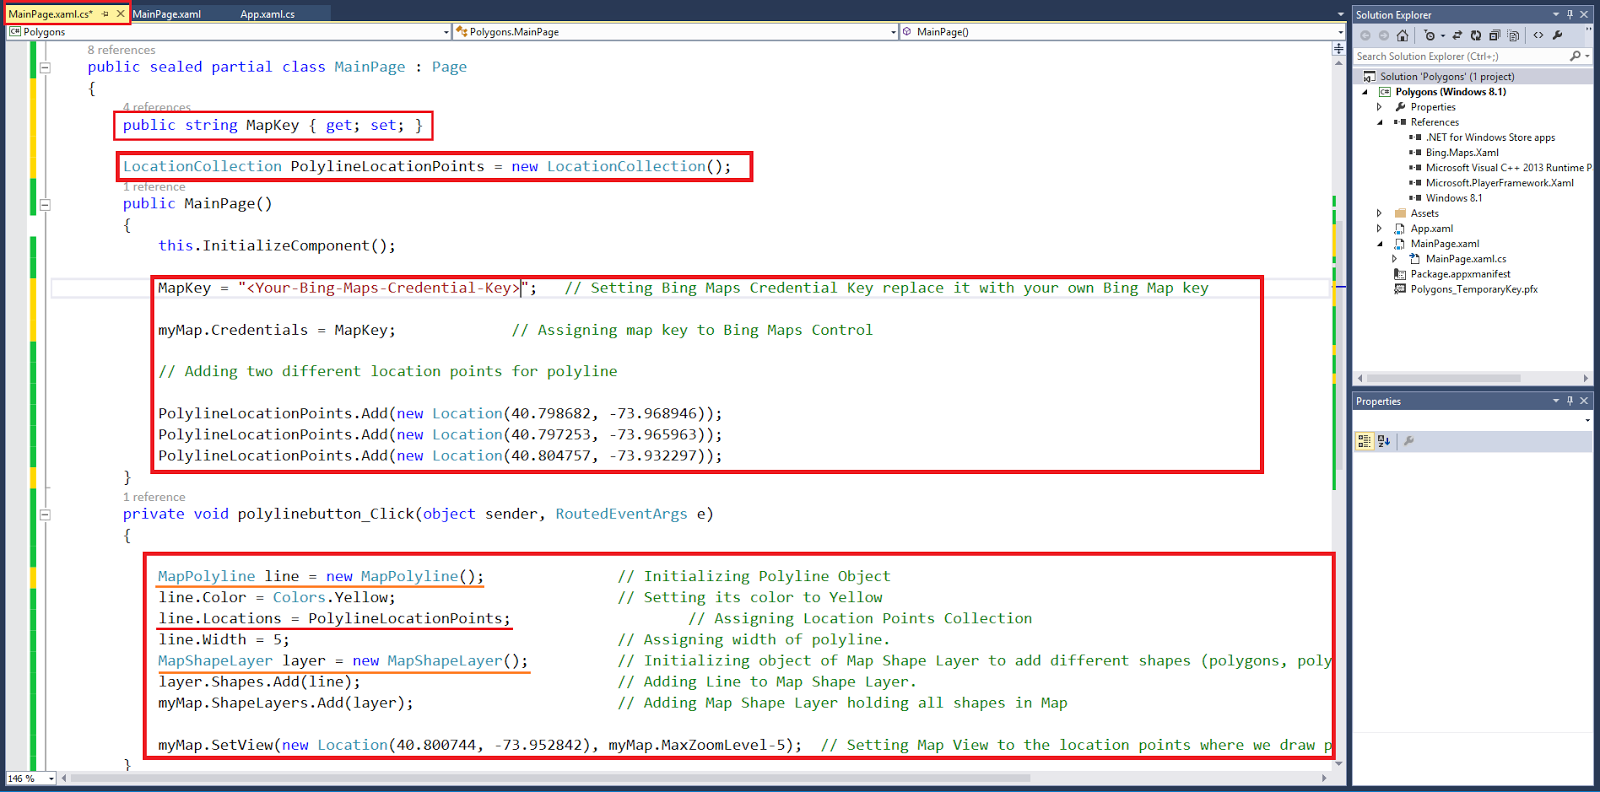
10- Now create string property to set and get Maps Credential key paste the code given below before constructor in you MainPage class in MainPage.xaml.cs

        
public string MapKey { get; set; }


11- Now set the Bing Maps Credential Key, paste the code given below in MainPage class constructor in MainPage.xaml.cs

// Replace your Bing Maps credential key

MapKey = "<Your-Bing-Maps-Credential-key>"

myMap.Credentials = MapKey;    // Assigning map key to Bing Maps Control

12- Its time to draw polyline between two location points. so first we have two different location points.

13- Create and Initialize the Object of LocationCollection class and add different locations in it statically and add two or three different location points in it. 

14- Paste the code below in constructor to store different location points for polyline

LocationCollection PolylineLocationPoints = new LocationCollection( );

15- Paste the code below in constructor

// Adding different point locations to draw polyline on map


PolylineLocationPoints.Add(new Location(40.798682, -73.968946));

PolylineLocationPoints.Add(new Location(40.797253, -73.965963));

PolylineLocationPoints.Add(new Location(40.804757, -73.932297));

Now we need to do the following to add polyline in maps. 

Create and Initialize object of Map Polyline class to create polyline and set its properties like width, color and location points. 
Create and Initialize the object of Map Shape Layer class to add all shapes (polygons,polylines) which you want to add on maps to it. 
Add Map Shape Layer to maps as its shape layer.
Set the view of Map and zoom to location where shape is added. 


16- Add some code written below  in polyline button click event to draw polyline after clicking the button. Paste the code given below in it. 


MapPolyline line = new MapPolyline();    // Initializing Polyline Object


line.Color = Colors.Orange;                   // Setting its color to Orange


// Assigning Location Points Collection

            
line.Locations = PolylineLocationPoints;  

line.Width = 5;                                    // Assigning width of polyline. 

// Initializing object of Map Shape Layer to add different shapes (polygons, polylines) on map.
            
MapShapeLayer layer = new MapShapeLayer();   
            
layer.Shapes.Add(line);                          // Adding Line to Map Shape Layer.

// Adding Map Shape Layer holding all shapes in Map            

myMap.ShapeLayers.Add(layer);              

// Setting Map View to the location points where we draw polyline.

myMap.SetView(new Location(40.800744, -73.952842),myMap.MaxZoomLevel);  

Now your code in MainPage.xaml.cs will look like this 


17- Now clean the solution and build it from build menu and run it on local machine. After application launching application click the Add Polyline button and see that you map will move toward the points where you have added the polyline. Location points are represented as point A,B and C in screenshot below. 


18- Now add some more code to draw polygons on the map, most of the code is similar to the above code. 

19- Again create and initialize new object of location collection class for polygon and add some location points in it as we did above. 

20-Add the code below before constructor of the MainPage.xaml.cs class.

LocationCollection PolygonLocationPoints = new LocationCollection( );

Add the code below within in the constructor


// Adding two different location points for polygon


PolygonLocationPoints.Add(new Location(40.808785, -73.936352));

PolygonLocationPoints.Add(new Location(40.804270, -73.937404));


21- Now same as above add some code in Add Polygon button Click Event to add polygon on maps.

Create and Initialize the object of Map Polygon class to create polygon and set its properties like visibility, Fill Color and Location Points. 
Create and Initialize the object of Map Shape Layer class to add all shapes (polygons,polylines) which you want to add on maps to it. 
Add Map Shape Layer to maps as its shape layer.
Set the view of Map and zoom to location where shape is added.


MapPolygon polygon= new MapPolygon();     // Initializing Polygon Object


polygon.FillColor = Colors.Red;                   // Setting its color to Red


// Assigning Location Points Collection


polygon.Locations = PolygonLocationPoints; 


// Assigning visibility of polygon. 


polygon.Visibility = true;  
                         
// Initializing object of Map Shape Layer to add different shapes (polygons, polylines) on map.
            
MapShapeLayer layer = new MapShapeLayer();   
            
layer.Shapes.Add(polygon);            // Adding polygon to Map Shape Layer.

// Adding Map Shape Layer holding all shapes in Map            

myMap.ShapeLayers.Add(layer);              

// Setting Map View to the location points where we draw polyline.

myMap.SetView(new Location(40.800744, -73.952842),myMap.MaxZoomLevel);


Now you code in MainPage.xaml.cs will look like this


22- Now again clean the solution and rebuild it from build menu and run it on local machine. After application launch click both button one by one and you will see the polyline and polygon on your Bing Maps. 


So we have added polyline and polygon to our Bing Maps successfully.

If you have any issue or confusion regarding this topic kindly inform me in comments so I will be able to help you. Sample project is also available to download.


Windows Mobile Professional


Monday 21 July 2014

Maps for Windows Phone 8


Introduction


Hi Everybody, 

Today I am gonna tell you some basics of Maps control and its implementation in Windows Phone. It is very easy to use Maps in windows phone application.

Objective

In this blog post I will show you

  • To add Map Control in Windows Phone App.
  • To add Image as Pushpin on Map on current location.
  • To use different cartographic modes of map.
  • To add set the view and center point of map.
  • To set the zoom level and water mark mode of map.

Requirements 

1- To add maps we only need to add a namespace Microsoft.Phone.Maps.Controls in MainPage.xaml and MainPage.xaml.cs 
and We need to check for the Map Capability as well in WMAppManifest.xml file in properties of application to allow the application to access the Maps

2- To get current location we need to add a namespace System.Device.Location in MainPage.xaml.cs to use GeoCoordinateWatcher to get the current location of user. And for accessing user location we also need to check the Location capability in WMAppManifest.xml 

3- An Image which we has to put as a pushpin on maps. 

Implementation

1- Create new project and name it. 
2- Go to solution explorer > open properties > open WMAppManifest.xml > Go to Capabilities tab and check both Maps and Location Capabilities. 

You WMAppManifest.xml file will look like this 


3-Now Open MainPage.xaml > open toolbox > open common window controls.
4-Find Map control and drag it into your designer or place it in your Grid. 

Note: When you drag Map control in your designer it will automatically add Microsoft.Phone.Maps.Controls namespace at the top of MainPage.xaml.


Now your MainPage.xaml will look like this


5- Rename the map control and add some radio buttons normal buttons name them properly and set their content and their events to perform different tasks.

Now your MainPage.xaml designer will look like this 


6- Now Open MainPage.xaml.cs 

You will see that all events handlers which you have created will be shown to you there. like in my MainPage.xaml.cs


7- Now we have to add two namespaces which we have discussed in our requirements section. 


1- Microsoft.Phone.Maps.Controls (to access Map and its child controls)
2- System.Device.Location (to get current location using device GPS or location API)

Below is the snapshot of namespaces added 


8-Now we have to add an image in our projects asset to use it as pushpin on map.
9- After adding Image again open MainPage.xaml.cs

10- Now we have to use add some code to get current location paste the code below before constructor in MainPage Class.

GeoCoordinateWatcher watcher = new GeoCoordinateWatcher(GeoPositionAccuracy.High);

11- We have to provide mode of map initially and check its radio button by default to present it as selected mode

so for doing that copy the code below in constructor to assign mode of map initially.

Road.IsChecked = true;

myMap.CartographicMode = MapCartographicMode.Road;

Now your code will look like in snapshot shown below


12- The next thing is to change mode of map using radio button so to do that just copy a single line in each radio button checked event. 

For Road

myMap.CartographicMode = MapCartographicMode.Road;

For Aerial

myMap.CartographicMode = MapCartographicMode.Aerial;

For Hybird

myMap.CartographicMode = MapCartographicMode.Hybrid;

For Terrian

myMap.CartographicMode = MapCartographicMode.Terrain;

Now your code will look like this 


13- Now clean the solution and build it from build menu and you will see Road option will be selected by default and you can use different mode by selecting different radio buttons. 

14- Now its time to implement zoom in and zoom out functionality. It is very simple to implement zoom in and zoom out functionality for maps.

Note: Map controls is also able to zoom in, zoom out map using gestures like pinching.

15- Paste the code below in zoom in button click event

            if (myMap.ZoomLevel < 18)
            {
                myMap.ZoomLevel++;
            }

and this in zoom out button click event 

            if (myMap.ZoomLevel > 1)
            {
                myMap.ZoomLevel--;

            }


Now your MainPage.xaml.cs page will look like this 


16- Clean the solution and build it from build menu again and Run it on you emulator or device.

17- Click the zoom in and zoom out button to change the zoom level of you map control. 

18- Now its time to get current location and add a pushpin to that location so to do that paste the code written below in add pin button click event to add image as pushpin at current location on map.


if(!watcher.Position.Location.IsUnknown)
{
       Image img = new Image()
       {
           Source = new BitmapImage(new Uri("pushpin.png", UriKind.Relative)),
           Width = 50,
           Height = 50,
           HorizontalAlignment = System.Windows.HorizontalAlignment.Left,
           VerticalAlignment = System.Windows.VerticalAlignment.Top,
           Stretch = System.Windows.Media.Stretch.Uniform
        };
                
        MapOverlay overlay = new MapOverlay()
        {
           GeoCoordinate = new GeoCoordinate(watcher.Position.Location.Latitude, watcher.Position.Location.Longitude),
           PositionOrigin = new Point(0, 0),
           Content =  img,
               
         };
                
          MapLayer layer = new MapLayer();
          layer.Add(overlay);
          myMap.Layers.Add(layer);
            
 }
            
else
{
     MessageBox.Show("Unable to Find Current Location");

}

Your addpin_Click Event will look like this 


19- Clean the solution and build it from Build menu and run it on emulator or device. 

20- After app launching click add pin and you will see that image will be appear on you map. Continuous tapping on image will continuous zoom the map and will take you towards your exact location. 

21-Now our next and objective is to set view and center point of map when pin is added by pressing add pin button.

22-To implement that we just need to add two lines of code at the end of click event 

myMap.SetView(new GeoCoordinate(watcher.Position.Location.Latitude, watcher.Position.Location.Longitude), 18);

Now your addpin button Click event will look like this 


23- Now Clean the solution again, rebuild it from build menu and run it. 

24- When you application will launch, click the add pin button and map will automatically move towards you exact current location. 


Note: Use the exception handler to handle the exception in the code as I haven't but it is good practice. 

Conclusion


So here we go, we have implemented maps in phone and added image as pushpin by getting current location using Geo Coordinate Watcher, Control zoom of map and change mode of map.

The sample project is available below


Windows Mobile Professional

Wednesday 16 July 2014

[Solved] Find Direction using Bing Maps


Introduction


Hi, today I am gonna show you that how to draw route between two location points in windows phone 8 application using Bing Maps Direction Task.

Bing Map Direction Task is a built in launcher in windows phone which takes two location points and display the route between them by launching Bing Maps. 

To use Bing Map Direction Task we need to add library or namespace Microsoft.Phone.Tasks and System.Device.Location in our MainPage.xaml.cs


Requirements

There is nothing special required to use Bing Map Direction Task. The only thing before doing this is to know about the Location Class, Launchers and choosers for windows phone and two location points between which we have to draw route. 


Assume that we have two location points 

Location A Coordinates : 40.782946,-73.965369Location B Coordinates : 40.727586,-73.992433 

Implementation

Now we will implement Bing Maps Direction Task to draw route.

1- Create New Windows Phone Silverlight Blank App.

2- Open MainPage.xaml from solution explorer.

3- Remove all content in designer and Add Button, change its Name to "directionbutton" and content to "Get Direction" from properties panel and create its Click Event

4- Now your MainPage.xaml designer will look like in the picture below 


5- Open MainPage.xaml.cs Add Microsoft.Phone.Tasks and System.Device.Location namespace with other namespaces at the top of the page. 

Now your code will look like this


6- Now add the code given below inside the direction button click event 

// Creating new Object of Bing Maps Directions Task and Intialize it with Starting and Ending Location Points
          
  BingMapsDirectionsTask bing = new BingMapsDirectionsTask()
  {
     //Giving label and coordinates to starting and ending points. 

   Start = new LabeledMapLocation("Location A", new GeoCoordinate(40.782946, -73.965369)),
               
    End = new LabeledMapLocation("Location B", new GeoCoordinate(40.727586, -73.992433))
          
  };
           
 // Launching Bing Maps Direction Tasks


 bing.Show();


Now your code in MainPage.xaml.cs will look like this 


7- Clean the solution and from build menu, build it and deploy it in emulator or windows phone. 

8- After launching application you will see a blank page with one button you added. like the picture below 


Click the Get Directions Button and you will see new application will automatically launch that is called launcher. And will show you many information about your route.

1- It will draw route between two given point.
2- It will display time required to cover distance. 

3- You can check route and other information  for driving cars, bus and pedestrian.

4- It will provide you suggestion to take left or right after some specific distance. 

5- By starting voice navigation you will get suggestions via voice. 

6- Route steps show you all steps to follow route. 


Conclusion

We have learned to draw a route between two different location using Bing Maps Directions Task by giving starting and ending points to it. 


Sample

Below is the sample you can download it and can get help from it also.


Windows Mobile Professional